
Table of contents
- Overview
- Create your job
- Upload your names list
- Configure Smart Shooter
- Photo shoot
- Upload your images
- Set your price list & automated campaign
- Set your job to selling
- Deliver the final images
- Additional workflows and FAQ
- The takeaway
Overview
Introduction to corporate headshots
Welcome to the definitive guide that will allow you to leverage GotPhoto to successfully manage your Corporate Headshot job from start to finish.
This guide specifically covers corporate headshots. We define corporate headshots as headshot sessions on location at a business where you photograph multiple employees and deliver final digital images back to the business.
With our new integration with Tether Tools, we will show you how to leverage Smart Shooter 5 to photograph your sessions tethered. This allows you to proof the images easily at the photo shoot, allowing employees to make their favorite image selections and provide feedback if they are not happy with how they look.
To learn more about the value of corporate headshots, check out 3 Reasons for Volume Photographers to do Professional Headshots.

Let’s get started! This guide assumes the following:
- You have signed up to GotPhoto.
- You have completed your one-time settings.
- You have Smart Shooter installed on your tethering laptop.
- You have a USB barcode scanner.
- You use Lightroom Classic and have the GotPhoto Lightroom plugin installed.
Create your job
This section covers how to create a new Corporate Headshot job in GotPhoto.
- On your account dashboard, click +Create New Job.
Complete the following required fields:
- Job name: Name it after the business. Include the year or month if it’s a recurring job.
- Date of picture day: This is the actual shoot date, not the job creation date.
- Job type: Choose Event → Company. This enables tracking and statistics.

After filling out the fields, click Save photo job. Advanced settings are not required for this job type.
You’ve now created your job and are ready for the next step.
Upload your names list
This section explains how to upload your spreadsheet of employee names and generate barcodes.
What is a names list? This is your CSV or XLS spreadsheet of employees to be photographed. Load it into GotPhoto a few days before the shoot to generate barcode cards.
The spreadsheet should include:
- Employee First Name
- Employee Last Name
- Employee Email Address
- Employee Mobile Number
- [Optional] Appointment Day
- [Optional] Appointment Time
Download a sample template here.
⚠ Important: Ensure first and last names are in separate columns.
To upload the names list:
- Open the job you just created from the Photo Jobs page.
- Under Access Type, select Access code for each person.
- Under Choose a method, select QR-Tagging - with list of names.
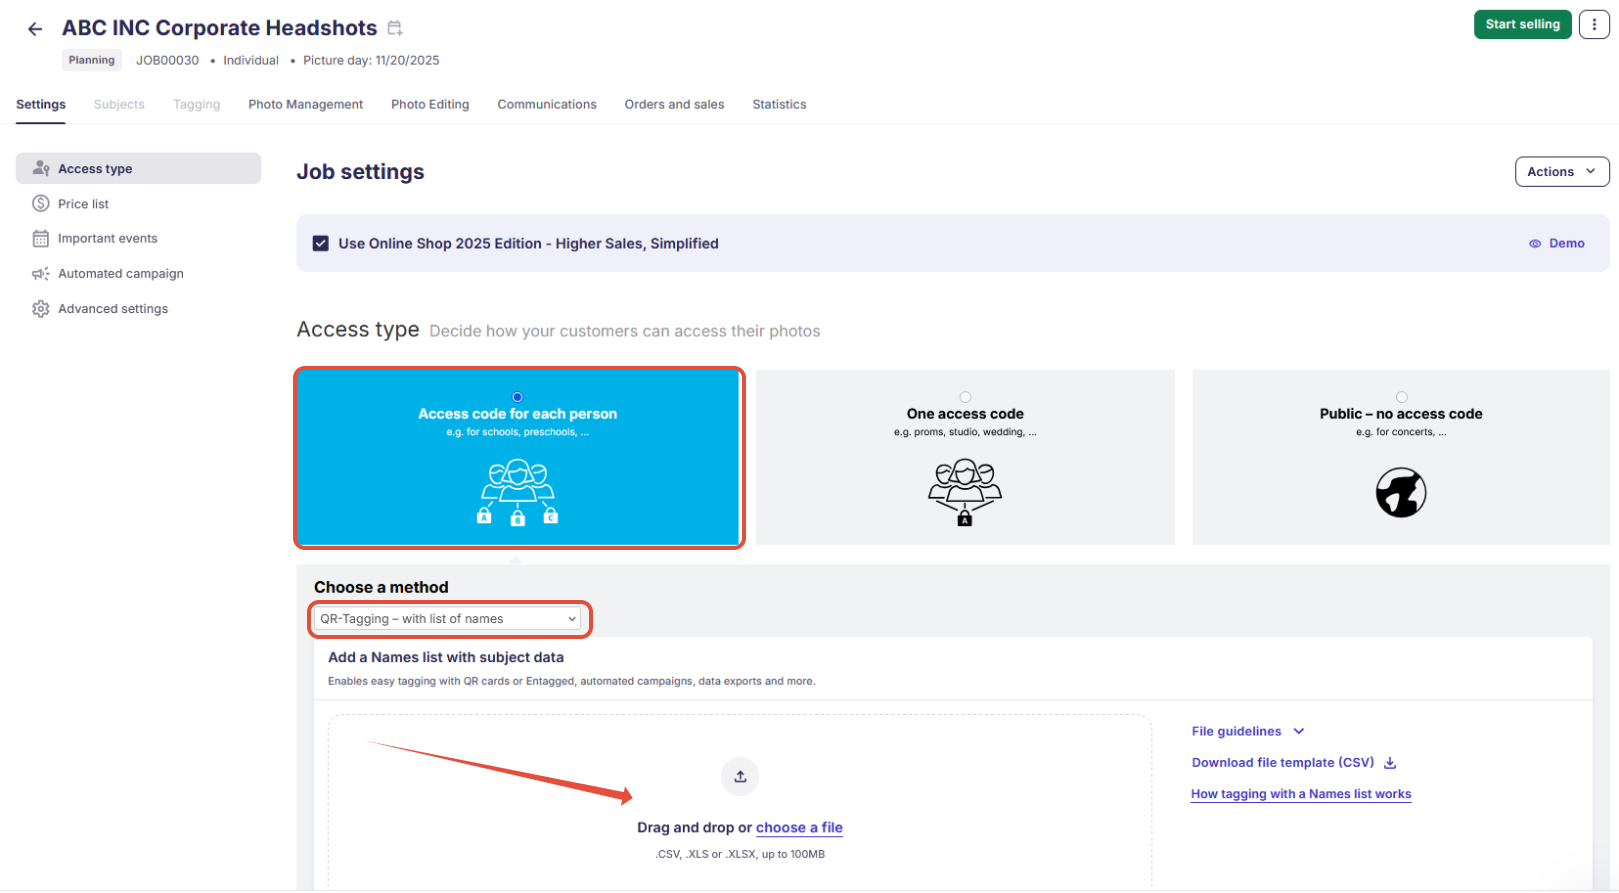
Drag and drop your names list or click Choose a file and select your spreadsheet.

During the upload, map the columns:
- First Name → Student firstname
- Last Name → Student lastname
- Email → Parent email (1)
- Phone → Parent phone (1)
- Appointment Date → Teacher*
- Appointment Time → Group*
[Optional] Appointment data is not required but helpful for session planning.
Click Confirm Columns, review the data, then click Start import.

After import completes, generate barcodes:
- Go to the Names List page.
- Click Export and select PDF with barcodes.

This PDF includes names and corresponding barcodes. Print and bring to the shoot.

To return to this screen later, click Manage Names on your job’s Settings page.

You’re now ready for the photo shoot with barcodes in hand.
Configure Smart Shooter
This section covers how to configure Smart Shooter 5 for tethered photography with GotPhoto.
Before your shoot, make sure you have Smart Shooter installed. Purchase it from Tether Tools.
- One-time purchase
- Compatible with Windows and macOS
- Works with many Canon, Nikon, Sony, and Fujifilm models — see full list
- Documentation available here
You’ll also need a USB barcode scanner.

After installation and activation, configure Smart Shooter with the following recommended layout:

Enable these views:
- Session
- Barcodes
- Preview
- Filmstrip
- Photos
- Camera Controls
Note: Save your preferred layout under the Layout tab.
Set filename format
Go to File → Options → Name Policy. For Photo Filename, use the expression:
[O]_[Z] (original filename + scanned barcode)
This confirms barcode association in metadata.

Nikon users: Use [N]_[S]_[D] instead.
Set photo save location
In the General tab, set the Photo Download Directory to either a local or external folder.
Configure barcode options
Enable the Barcodes view and configure the options:

- [Optional] Auto Scan Barcodes – for TTL reading (USB scanner is preferred)
- Add Barcode to Photo Metadata – Required
- [Optional] Play Sound After Scan – optional feedback chime
- [Optional] Restrict Barcode Format – select Code128
- [Advanced] Limit to Camera – for multi-camera setups
Session view setup
Make sure Session View is active:

Keep your cursor in the Barcode field. When you scan a barcode, the value is inserted here and gets attached to the metadata of subsequent images.
With Smart Shooter configured and barcode list ready, you’re set for the shoot.
Photo shoot
This section explains how to run your corporate headshot session using a tethered Smart Shooter setup.
- Connect your camera to your laptop using a USB tethering cable.
- Smart Shooter will recognize and activate the camera if compatible.

Ensure the Session tab is open and your cursor is in the Barcode field.

- Use your USB barcode scanner to scan the employee’s barcode.

This input appears in the Barcode field, ready for tagging the captured image.

- Photograph your subject. Smart Shooter embeds the scanned barcode into the image metadata.
This ensures images are correctly sorted and assigned upon upload to GotPhoto.

Employees can view their image on the screen, allowing immediate feedback and approval.
- When ready to shoot the next person, place your cursor back in the Barcode field and scan the next barcode.
Note: There is no need to manually delete the previous barcode—scanning the next one will overwrite it.
Repeat this process for each employee.

Once the photo shoot is complete, return to your studio to upload and process the images.
Upload your images
This section covers how to import, edit, and upload your images to GotPhoto using Lightroom and the GotPhoto Plugin.
You may also use the Easy Upload tool, but Lightroom is recommended for this workflow.
- Locate the folder where Smart Shooter downloaded your images.

- Open Lightroom and import the images.

Complete your usual workflow — culling, cropping, editing, etc.
If you’d like to outsource editing to GotPhoto, see this article.
- If the subject chose a favorite image during the shoot, mark it as five stars in Lightroom.

This flags the favorite image in GotPhoto automatically upon export.
Note: To allow gallery-based favorite selection instead, use the Favorite Selection workflow in Section 9.
- Select images to export, then click Export.

First-time users: Enter your GotPhoto login credentials in the plugin.
Set the export options as follows:
- Export To: GotPhoto Upload V3
- Job: Select the job name
- Album Name: e.g., Upload or Session
- [Optional] Adjust file naming, sizing, and sharpening as needed
Click Export to start the upload.

- Once upload completes, go to your job in GotPhoto and click Photo Management.

Click on the uploaded album to review images.
Note: Thumbnails may take a few minutes to generate.
You will see all photos auto-sorted and tagged with the correct subject’s data:

The five-star rating from Lightroom will appear as a yellow favorite star in GotPhoto.
If an image is incorrectly tagged, drag it to the correct subject.
To change a favorite image:
- Click the image thumbnail
- Select Tag as Favorite Photo

Review all assignments and ensure everything is properly sorted. You are now ready for pricing and final steps.
Set your price list & automated campaign
This section explains how to set up your pricing and automated communication for a Corporate Headshot job.
Assign a price list
Go to the Settings tab of your job and choose a price list.
To offer digital downloads or print sales, create a price list. If you’re new to price lists, see this guide.
If the contract includes one free download per subject, create a profile with the Download All Photos product priced at $0.

Select the price list and click Save Settings.

[Optional] Add upsell options
To encourage additional sales, include more than one photo per subject and set a price for extra downloads.
- Add the Photo Download product and set a price
- [Optional] Include high-quality prints from your lab partner

[Optional] Add a coupon
Create a job-specific coupon to deliver the free download while encouraging more purchases.
- Set the coupon value to match the free download price
- Assign an expiration date

Create and add an automated campaign
An automated campaign automates email and SMS notifications. Use it to alert subjects when their gallery is ready, and downloads are available.

If you’re new to this setup, read how to create a communication profile.
Reminder: If using SMS, configure your SMS settings.
For headshots, one or two messages may be sufficient:
- Email and SMS are sent when job is set to Selling
- [Optional] Follow-up email a few days later

Tip: Duplicate a built-in campaign such as Generic GotPhoto with 3 Day Coupon and modify it to simplify setup.
Once pricing and communication settings are saved, you are ready to set your job to Selling.

Set your job to selling
This section explains how to make your job live for subjects to access their photos and begin ordering.
Before activating, double-check the following:
- All images are reviewed, sorted, and correctly tagged
- Price profile is attached
- Communication profile is configured
- [Optional] Coupon is applied, if needed
When ready, go to your job’s Settings page and switch the toggle in the top right to Selling.

Confirm when prompted.

Once activated:
- Your communication profile will begin sending email and SMS notifications
- Subjects can log into their private galleries
- Subjects can download images or place print orders

You’re now ready to deliver selected images to your client.
Related articles: