
Table of contents
- Overview
- Full video walkthrough
- Step 1: Create a new photo job
- Step 2: Enter job details
- Step 3: Define job settings
- Step 4: Access and edit settings anytime
- Internal job name guidance
- Pro tips
- The Takeaway
Overview
Ready to get started? This guide walks you through first step with GotPhoto: creating a photo job. Ensure your account setup is complete before proceeding.
Full video walkthrough: How to set up your first job with GotPhoto
[Available for customers in US & Canada] Pro tip: Explore in-product tour “How to set up my Photo Job” during account creation or anytime from the Help tab in top-right menu.
Step 1: Create a new photo job
On your dashboard, click Create job.

Step 2: Enter job details
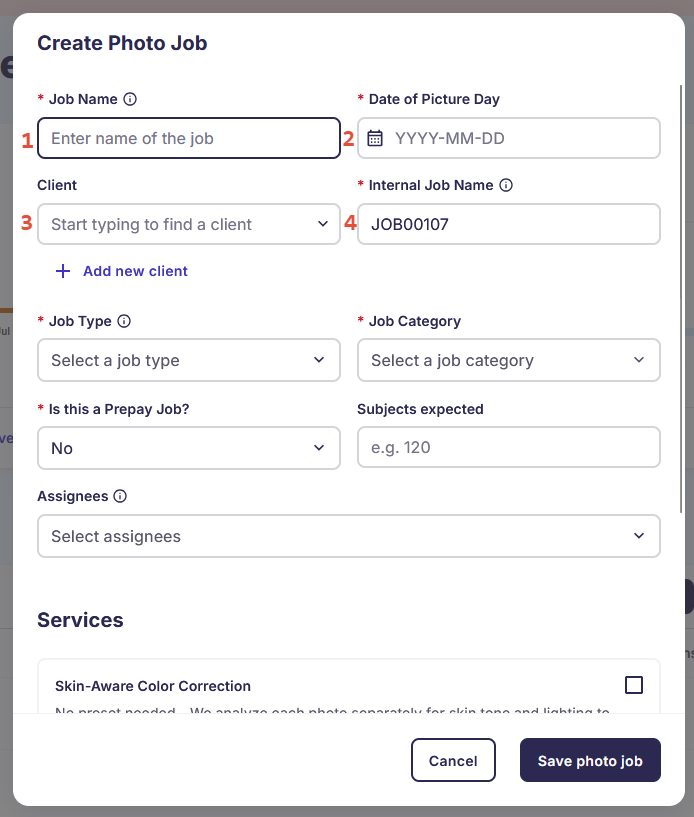
- Job name: This name appears publicly in your online shop. Use clear format like
Lincoln Elementary - 2025. - Date of Picture Day: Helps track and prepare for upcoming jobs. Create jobs a few days in advance.
- Client: Select or add organization associated with the job (e.g., school, league, dance studio).
- If existing: Start typing name and select from dropdown.
- If new: Add details.
Adding new organization (client)
- Enter address and contact person (e.g., principal or director).
- [Optional] Enable School Portal access. Clients will get email to set their password.
Depending on permissions, clients can:

4. Internal job name: Used for file storage and QR cards. Use formats like PlainviewHSFall2024.
Step 3: Define job settings
5. Job type: Used for reporting, e.g. School & Preschool
6. Job category: Select job category, e.g. Preschool
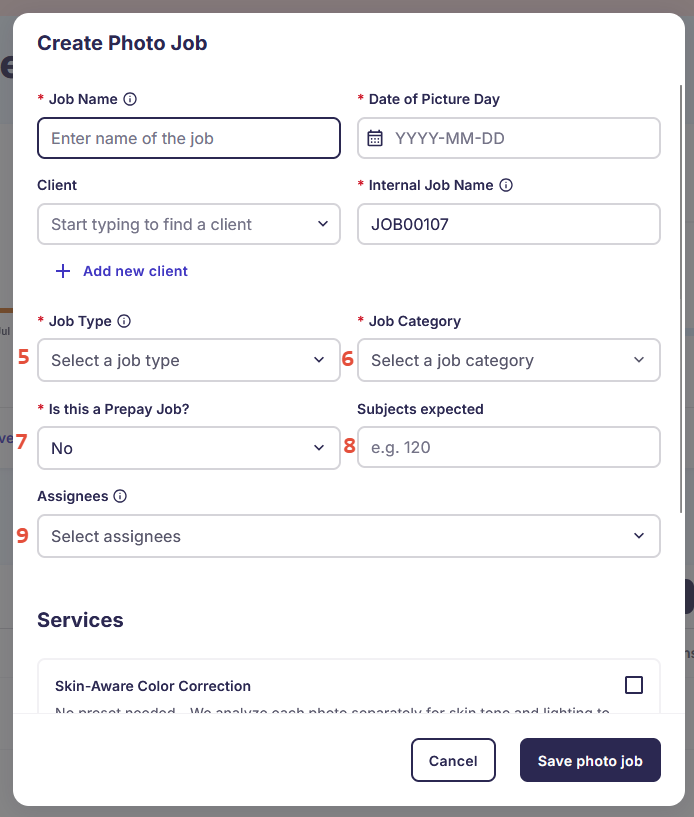
7. [Prepay only] Prepay: (US/CA only) Enable if using prepay sales.
8. [Optional] Subjects expected: Estimate high to print enough QR cards. For 100 expected, print 110.
9. [Enterprise only] Assignees: Assign team members with upload rights to job.
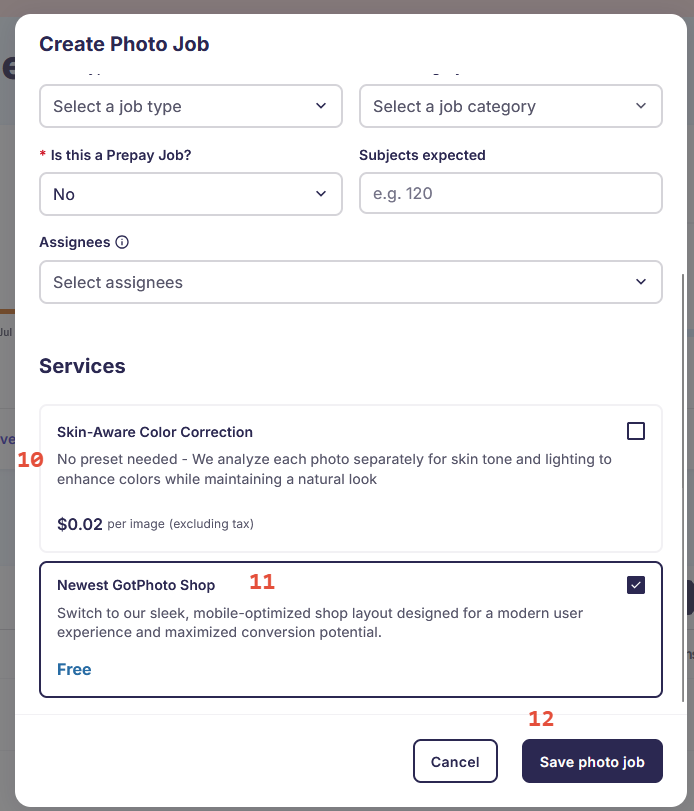
Services:
10. Skin Aware Color Correction: If selected, skin-aware color correction will automatically be applied during your photo upload. Learn more about this service here: Job Settings: Editing on Upload
11. Newest GotPhoto Shop: The New GotPhoto Shop will soon become the new default shop for all jobs, learn more here: new GotPhoto Online Shop
12. Save your photo job after completing these steps.
Step 4: Access and edit settings anytime
To make changes, go to Actions > Edit Job Information within the job.
Internal job name guidance
If using FTP or EasyUpload, use descriptive job names.
- Visible on QR cards
- Must be unique
- Only letters, numbers, dashes, or underscores
- Avoid starting/ending with dash or underscore
Pro tips
- If you select same job type in future job (e.g., Elementary School), GotPhoto will apply previous settings (e.g., tagging, pricing, coupons). You can still adjust them anytime.
- Save time and use our job duplication feature for future jobs: Save time and duplicate photo job
The Takeaway
Create your first photo job with confidence. Set up core elements like name, date, and organization (client) to streamline your workflow. Use advanced options to further customize your process as you grow.